In a mere 6 weeks, my "baby" will be officially classified as a TODDLER.
Wait. What? How did that happen??
I know, I'm just as shocked as he is. But I think I'm ready for all the fun and changes ahead.
I think. I hope!
Speaking of changes...
One of the biggest immediate changes I think most new parents fret over is toddler food. Suddenly we are responsible for providing our little ones with meals that meet ALL of their nutritional needs every single day. Previously, we were able to rely on them getting their core nutrition from the bottle or the boob. Now, it's up to us!
That being said, I'm hopeful that a new blog feature I'll be starting this week, Toddler Tuesdays, will help us all dive into this challenge with new ideas, recipes, and inspiration. More importantly, it will address one of the most common conversations I've had recently with other new moms of toddlers and soon-to-be toddlers. It may sound familiar. It goes something like this...
"What in the world do you feed your kid? I'm worried they're not getting enough nutrition, and I'm getting tired of all the same old finger foods and toddler foods!"
If that sounds at all familiar, or if you're just looking for new ideas, then Toddler Tuesdays is for you.
Toddler Tuesdays will be an additional blog post every Tuesday that will feature new toddler-friendly recipes, finger food ideas, or anything helpful I can drum up that relates to feeding our little ones healthy, easy, toddler and family-friendly meals and snacks. I'd prefer not to become a short order cook preparing special breakfasts, lunches, dinners, and snacks that only my soon-to-be toddler will eat, so hopefully my husband and I (and all of you) will enjoy these recipes and ideas as well!
You can look for these toddler inspired recipes and ideas to be posted on my blog on...Tuesdays! First one is coming up tomorrow!
Monday, March 14, 2011


Pizza with Roasted Peppers and Goat Cheese
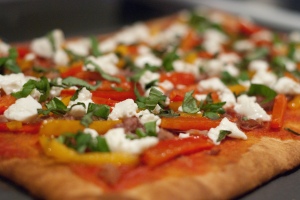 This pizza is light on sauce and topped with creamy goat cheese, fresh basil, roasted sweet peppers, and a little prosciutto (if you like). It's perfect for a quick weeknight meal, undoubtedly my new favorite make-at-home pizza, and I'm so glad I found it. Why?
Well, being from Chicago, pizza is a necessity. It's a weekly staple. Everywhere you go it's delicious. No matter how you shape it, bake it, or make it, it's perfection. There are no "mediocre" pizzas. If there were, they'd close in a week due to all the competition. But out here in Northern Virginia...not so much. Mediocre at best is all there is.
The hubs and I have tried all the chains, all the mom-and-pop pizza shops, all the places people have suggested to us, yet unfortunately the best pizza we've found out here is frozen pizza. Yes, it really is that bad out here. Sure, there are some that I would go so far as to consider decent, but when you're used to Chicago pizza, it's just really hard to compare. That being said, the hubs and I are always on the hunt for new and different frozen pizzas.
Well, I finally found my favorite about 2 years ago. I could've eaten it every night of the week. A crispy thin crust heaven of a pizza topped with creamy melted goat cheese and roasted sweet peppers. Simple, yet heaven in my book. Then, out of nowhere, the stores out here stopped carrying it! I searched everywhere. It was gone! I even checked the product webpage of the brand that made the pizza, and sure enough, they stopped making it! What?!? How could they?? I was heartbroken. Absolutely heartbroken.
So, as you can imagine, my eyes lit up and I immediately started salivating when I came across this recipe. It was every bit of the pizza heaven I remembered and then some. We devoured the whole thing.
Pizza with Peppers and Goat Cheese
Ingredients
- Pillsbury "thin crust" pizza crust
- Olive oil
- Cornmeal for sprinkling
- 1 red bell pepper, sliced
- 1 yellow bell pepper, sliced
- 1/2 cup tomato sauce
- 2 oz. sliced prosciutto, cut into fine shreds (optional)
- 4 oz. fresh goat cheese crumbles
- 1/4 cup chopped fresh basil, divided
- Salt and freshly ground pepper
Directions
- Position oven rack on the 2nd lowest rack in your oven. Preheat oven and large baking sheet at 500 degrees for at least 15 minutes.
- Heat a little olive oil in a small skillet over medium heat, and saute the sliced peppers about 8 minutes, until slightly softened.
- Generously sprinkle a large cutting board with cornmeal and lay the pizza dough on top. Brush lightly with olive oil.
- Remove the baking sheet from the 500 degree oven and carefully transfer the pizza dough. Prick a few holes in the crust with a fork and bake for a quick 3 minutes, just to firm it up a bit.
- Remove the partially baked crust and top with tomato sauce, prosciutto (optional), peppers, goat cheese, and half of the basil. Bake 5-7 minutes or until crust is golden brown. Watch it carefully while baking though, as it can burn quickly at 500 degrees!
- Allow to cool for 3 minutes. Top with the rest of the chopped basil, season with salt and pepper to taste, and serve.
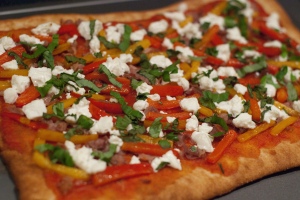
A few notes: Next time, I'm thinking of throwing in a few sliced red onions (sauteed with the sliced peppers) as well to get a few more veggies on my plate. Also, regarding the crust, I'm sure you could use any pizza crust for this recipe; however, I'd highly recommend sticking with a thin crust (I bet Boboli's whole wheat thin crust would be delicious...and a *tad* bit healthier than the Pillsbury in a can). Just adjust the baking time accordingly (omitting the pre-baking of the crust if your substitute is already pre-cooked). I used Pillsbury only because the hubs did the grocery shopping for the week and Pillsbury in a can was we got! And I wasn't going to complain. It was PERFECT! If you're ambitious you could even make your own thin crust as called for in the original recipe. I just don't have that kind of time on a weeknight. Oh, and one last note - I tagged this recipe as 'vegetarian' (even though it has prosciutto) as I'm certain it would be just as delicious without the prosciutto.
*Recipe adapted from this one over on the blog Apple A Day.
Friday, March 11, 2011
Salmon with Garlic Lime Butter Sauce
 With the season of Lent underway and fish being a popular Friday choice, I figured today was the perfect day to post another favorite salmon recipe. This salmon recipe particularly caught my attention because it's incredibly easy and uses all ingredients that I usually have in the house. Simple ingredients, but full of flavor (even my 10 month old loved it)! Serve it with some rice and a side of veggies and it's a perfect, quick, weeknight meal full of omega-3s.
I love to broil my salmon as I find it to be a pretty fool-proof way for it to always turn out just right; however, feel free to grill it, bake it, or do what you wish for this recipe. The garlic lime butter sauce is what makes this dish, and it doesn't get poured on top of the fish until after cooking!
As a side note, my husband and I like a little heat to just about everything we eat, so we actually added a dash of cayenne pepper to the sauce halfway through the meal on a whim. It gave us the desired effect, but if I were to prepare it again and was in the mood for a little heat, I would mince up a habanero or 2 for more of a refreshing punch of heat. The sauce is absolutely scrumptious as written though, so that is completely optional. But if you also like a little heat, it might be worth trying.
Salmon with Garlic Lime Butter Sauce
Ingredients
- 4 frozen salmon filets, thawed
- 1 1/2 teaspoons finely grated lime zest
- 1 large garlic clove, finely minced (or pressed)
- 1/4 cup freshly squeezed lime juice
- 1 teaspoon salt
- 1/2 teaspoon black pepper
- 1 stick (1/2 cup) unsalted butter, melted
Directions
1. Set oven to broil. Make sure your oven rack is positioned on the 2nd highest rung from the top.
2. Whisk together the garlic, lime juice, salt, and pepper. Continue whisking while slowly adding the melted butter. Set aside.

3. Place salmon filets in a glass baking dish lightly greased with olive oil or cooking spray. Season filets with a little salt and pepper.
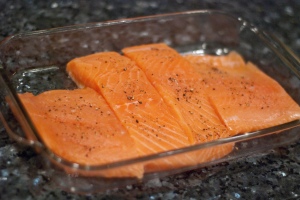
4. Use a foil "snake" (photo below) to prop your oven door open a bit while cooking (just do it...Alton Brown says so), and broil the filets for a total of about 7-8 minutes, flipping them once about half way through. Test for done-ness by cutting into one filet. Salmon should flake easily and be opaque in color.


5. Remove from broiler. Serve with a generous sprinkling of lime zest and a tablespoon or two of garlic lime butter sauce poured on top. (Whisk or stir up the sauce just before pouring as it will separate.)
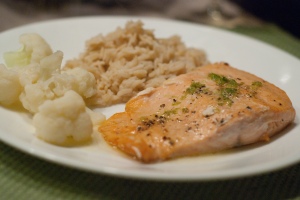
Note: You should have plenty of extra garlic lime butter sauce, so don't let it go to waste! It's excellent on vegetables. I served "clean out the freezer" veggies with our meal, so we served it over broccoli and cauliflower. It was delish! According to the original recipe, this sauce is also excellent on corn on the cob.
*Adapted from this recipe.
Thursday, March 10, 2011
Swiss Baked Chicken
 This recipe is perfect for those nights when you have zero energy to cook (something I think any working or SAHM or SAHD can relate to), yet you want a home-cooked meal. There's no chopping and you can have this baby prepped in 5 - 10 minutes. That being said, this recipe has become a regular in our household ever since my mother-in-law shared it with me a few years ago.
My husband remembers his mom making this meal quite regularly growing up. Having a family of 6 (including 4 very hungry boys and a husband) to feed every night, it's no wonder she turned to this recipe often. She usually doubled it, using 2 casserole dishes, to feed their family of 6.
Swiss Baked Chicken
Ingredients
- 4 boneless skinless chicken breasts
- Swiss cheese slices
- 1 (10.75 oz) can Cream of Celery soup
- 1/4 cup dry sherry, cream sherry, or vermouth-cooking sherry**
- 1 cup herb-flavored salad croutons
- 3 Tablespoons butter
**I've always used cream sherry since I can easily find it at the grocery store
Directions
- Preheat oven to 350 degrees.
- Arrange chicken in greased baking dish. Place cheese slices on top.
- In a small bowl combine soup with sherry and mix well. Pour over cheese.
- Sprinkle with croutons, dot with butter, and bake for 1 hour uncovered.

*Recipe courtesy of my Mother-in-Law.
Oh, and I can't forget... Honorable mention goes to my husband for doing the cooking of this dish the night it was photographed. (It had been a very long day...sick 10 month olds like to be held. A lot.) So way to go hubs! A home-cooked dish was just what I was craving after caring for our sick little love bug all day. I think it tasted even better since I didn't have to make it. ;)
Monday, March 7, 2011
Easy Oven-Roasted Asparagus
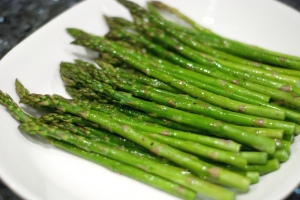
3 ingredients, 5 minutes to prep, and in the oven it goes. Can't get much better than that. This is the easiest and most delicious way I know to prepare asparagus.
Asparagus is one of those vegetables that screams spring, so with spring just around the corner, I figured it was about time we started eating it again. It's also incredibly nutritious. It's high in folic acid (great for any prego ladies out there), is a good source of potassium, fiber, vitamin B6, vitamins A and C, and thiamin. And did you know that the larger the diameter, the better the quality? Well now you do! So grab a bunch of asparagus next time you're in the produce section and give this a shot. It's quick, easy, healthy, and nutritious. Works for me!
Easy Oven-Roasted Asparagus
Ingredients
- 1 bunch of asparagus
- Olive oil
- Kosher or Sea salt and freshly ground black pepper
Directions
- Preheat oven to 400 degrees.
- Wash and trim the woody stems off of the asparagus so they're all approximately the same length
- Place asparagus in a single layer on a baking pan lined with foil for easy clean-up.
- Generously drizzle with olive oil and season with salt (don't be skimpy with the salt!) and freshly ground pepper.
- Roast in oven until the asparagus turns bright green and still has a slight crunch (I use a fork to test their done-ness), about 12-18 minutes. Do not overcook or they'll start to lose their crunch.
Thursday, March 3, 2011
Linguine with Shrimp Scampi
 When I saw the picture for this recipe in my Barefoot Contessa Family Style cookbook, I knew I wanted to try it. A few years later, and I finally did.
Why did it take me a few years to finally make this recipe? Well, I only have one excuse: I was intimidated by having to cook raw shrimp. I'd never cooked raw shrimp before, and the fear of overcooking it and having it turn rubbery was all it took to hold me back. But now, a few years later, I can successfully say I did it! And...it was easy! The instructions to this recipe were spot on and the result was restaurant quality deliciousness. It was also surprisingly easy to make (especially considering the impressive result), and I had most all of the ingredients already in the house.
Note: I thought the amount of lemon and garlic was perfect in this recipe as it was written, but I think my husband would have liked a little more garlic and a little less lemon. But in my mind, she who does the cooking wins. Maybe next time we'll make it his way. Either way, both flavors are very easy to adjust to your liking.
Linguine with Shrimp Scampi
Ingredients
- Vegetable oil
- Kosher salt
- 1 1/2 lbs. linguine (I used whole grain)
- 6 Tablespoons unsalted butter
- 5 Tablespoons olive oil
- 3 Tablespoons minced garlic (approx. 9 cloves)
- 2 lbs. peeled and deveined raw shrimp (approx. 32 large shrimp), thawed if frozen
- 1/2 teaspoon freshly ground black pepper
- 3/4 cup chopped fresh parsley
- Grated zest of 1 lemon
- 1/2 cup freshly squeezed lemon juice (about 4 lemons)
- 1/2 lemon, thinly sliced into half-moon rounds
- 1/4 teaspoon hot red pepper flakes
Directions
1. Bring a large pot of salted water to boil. Once boiling, drizzle a little vegetable oil in the pot, and then add 1 tablespoon of salt and the linguine. Cook according to the directions on the package.
2. While the pasta is cooking, melt the butter and olive oil in a 12-inch heavy-bottomed pan over medium-low heat. Add the garlic and cook for 1 minute, stirring often to make sure the garlic doesn't burn.
3. Add the shrimp, 1 tablespoon of salt, the black pepper, and saute for approximately 5 minutes or until the shrimp have just turned pink, stirring frequently.
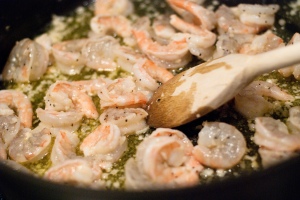
4. Remove from heat. Add the chopped parsley, lemon zest, lemon juice, lemon slices, and red pepper flakes to the pan. Stir to combine.

5. When the linguine is done cooking, drain the liquid, and put it back in the pot. Immediately toss together with the shrimp and sauce (in either the pasta pot or the heavy-bottomed pan).
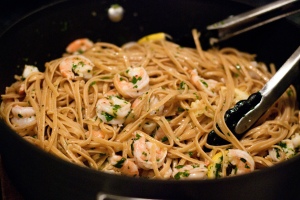
6. Serve and enjoy.

*Original recipe can be found in the cookbook Barefoot Contessa Family Style.
Subscribe to:
Posts (Atom)
