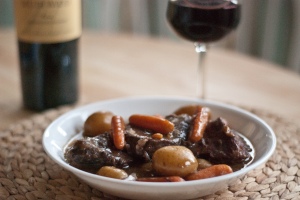
 This is pure comfort food. A cinch to prep and absolutely delicious. I'd never made a pot roast before, but several friends of mine had mentioned it was a perfect meal for the crock pot, so I figured I'd give it a shot. I knew it would please the hubs, who is just as much of a meat and potatoes guy as the next, and I also knew it would result in a meat that would be tender enough to serve to my 10 month old. He had never had red meat before this meal, so I wasn't sure what his reaction would be, but sure enough, I put a few thin shreds of the beef in front of him, and he dug right in without hesitation and immediately went for a second, third, and fourth bite until it was gone. I have a feeling he'll be a meat and potatoes guy just like his Daddy. Another bonus to this dish (for all the parents of little ones out there), is that the slow cooking of the vegetables in this dish made them incredibly tender and perfect for serving to a little one such as my son...who only has 6 teeth. Cut into small pieces, he went to town. (You could even mash them easily with a fork if your little one is still eating purees.) Any meal I can prep that makes everyone happy and doesn't require me to be a short order cook is a super win in my book!This dish wasn't just about convenience though. I believe my husband said, "This is good. Wow, this is really good. No, really - this is really good!" at least 5 times throughout the meal...and then again after he went up for a second helping. So I'll take that as a sign of a true keeper.Simple Slow Cooker Pot RoastIngredients
- 3-4 lb. roast
- 2 (10 3/4 oz.) cans cream of mushroom soup
- 1 envelope dry Beefy Onion soup mix
- 1 Tablespoon worcestershire sauce
- 1 teaspoon dried thyme or rosemary (I used thyme)
- 2 cups baby carrots
- 2 cups small potatoes (I kept mine whole since they were small, but you might want to halve yours if they're on the large side)
- 8 oz. sliced mushrooms
Directions
- Combine the cans of soup, dry onion soup mix, and worcestershire sauce in the crock pot and mix until combined.
- Place the roast in the pot.
- Add the carrots, potatoes, and mushrooms (and any other veggies you're in the mood for).
- Cook on low for 4 hours and then turn the heat up to high and cook for another 2-4 hours. (You could also do high for 3-4 hours or low for 7-9 hours. 4 on low followed by 2 on high is the route I chose though, and it resulted in a ridiculously tender meat.)
Note: This is a versatile recipe in that you can vary the herbs and use any veggies you have in the fridge (onion, celery, carrots, potatoes, mushrooms, etc.). You could even leave out the veggies and just prep them on the side if you wish.*Adapted from allrecipes.com.
 Back when I lived in Chicago, I took several cooking classes at an amazing place that I wish would spread its wings and open up shop in other states and cities around the U.S. (Northern Virginia would be nice) because I seriously miss that place. It was called The Chopping Block. It was a recreational cooking school offering all sorts of classes. I spent a whole summer attending as many as I could, loving them all. One of my favorites, though, was the monthly course taught by a local registered dietician, Dawn Jackson Blatner, RD, LDN. For the first 25 years of my life, I never really craved or loved veggies...until I took her classes. She quickly converted me with all the delicious and nutritious recipes she prepared for us in her classes. As a result, I learned that veggies weren't just bitter green things that needed to be smothered in butter and cheese in order to taste good. And today I am able to say that I love veggies, beans, greens, whole grains, and all things good for me. Yes, miracles do happen.That being said, this mexican pizza was one of the first recipes from Dawn that I loved at first bite. I've made it at least 30 times, and there have been many months where I've made it every single week. Yes, I crave it that much. It's a pretty simple recipe for a mexican pizza, but it's delicious and on the table in 30 minutes. Even better - you can feel good about devouring it since it's packed with nutrition. As for the toppings, feel free to vary them to your liking. The hubs and I always do. We literally divide our pizza in half by drawing a line in the sand (beans) and then we each put the toppings on our half. Marriage is all about compromises, right? Basically, the hubs' side gets more green onion, more jalapenos, more olives, and less tomato.(Recipe makes 2 full pizzas as written. Obviously just cut everything in half if you want to make 1 pizza.)Mexican PizzaIngredients
- 2 whole wheat thin crust pizza crusts (Boboli Thin Crust or Whole Foods 365 brand™)
- 1 (16 oz.) can spicy vegetarian refried beans
- 2 small tomatoes (I used roma), very thinly sliced
- 6 green onions, chopped
- 1/4 cup canned sliced black olives, drained
- 1/2 cup pickled jalapeño slices (aka, “nacho" peppers)
- 1/2 cup shredded cheddar jack cheese (I'm usually all for more cheese, but too much can actually ruin the flavors here; don't be tempted to dump it on)
- 1/2 cup salsa
- 1 avocado, chopped
Directions
- Preheat oven to 400 degrees.
- Spread beans on pizza crust and top with tomatoes arranged in a single layer. Top with onions, olives, peppers, and cheese.
- Place pizza straight on the oven rack (no baking sheet needed) and bake for 10 - 12 minutes.
- Slice into wedges and top with a little bit of salsa and a few slices of avocado (These toppings are a MUST! Do not skip this step!).
 Notes: I highly recommend sticking with a very "thin crust" pre-baked crust for this pizza. Boboli white/regular or whole wheat thin crust is excellent. I do not recommend a thick crust or a canned crust like the Pillsbury variety. *Original recipe from the very talented lady who finally convinced me that ALL veggies can be delicious, Dawn Jackson Blatner RD, LDN.
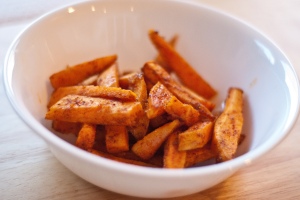 When searching for a nutritious and delicious side dish that both the hubs and I could enjoy alongside our 10 month old, sweet potatoes immediately came to mind. I mean really - have you ever met a baby that doesn't love sweet potatoes? They're a pretty common first veggie, and my son fell in love with them at first bite. And now that our little man is eating what mommy and daddy are eating, sweet potato fries were an obvious choice for a regular side dish. In hopes of exposing my son to more flavors, I prepared these sweet potato fries 3 different ways. It was a bit of a taste test experiment sort of deal. Go figure, he loved all 3 ways and didn't seem to care whether they were coated with the ordinary salt and pepper or a combination of a few random spices. But in case your child is a picky eater, this is an easy veggie side dish to try as a means for introducing new spices and flavor combinations, so get creative! Pumpkin pie spice, chinese five spice, garam masala, cajun seasoning...the sky's the limit. Just peel and cut 3 sweet potatoes into sticks, and then toss them in your desired spices with a little bit of oil. Below are just 3 of the ways I chose to prep them this week. Which one do you think you or your little one will like best?Tip: I peeled and cut the potatoes into sticks one day, and then time got away from me (anyone else have that problem?), so I just put them in a container and covered them in cold water until I was ready to use them. After draining them and patting them dry, they were perfectly crisp and ready to go even after 3 days sitting in the cold water. That being said, this would be a perfect veggie side dish to prep on a Sunday and have ready to go for a quick weeknight side. My 10 month old devoured them for dinner one night and lunch the next. The hubs and I enjoyed every last bit of them as well.Sweet Potato Fries - 3 Ways#1 - Ingredients
- 1 sweet potato, peeled and cut into sticks
- 1 Tablespoon olive oil
- kosher or sea salt
- freshly ground black pepper
#2 - Ingredients (inspired by this yummy recipe)
- 1 sweet potato, peeled and cut into sticks
- 1 Tablespoon olive oil
- 1/1 teaspoon garlic salt
- 1/2 teaspoon chili powder
- 1/4 teaspoon ground ginger
- 1/4 teaspoon ground cumin
#3 - Ingredients
- 1 sweet potato, peeled and cut into sticks
- 1 Tablespoon olive oil
- 1/4 teaspoon cumin
- 1/4 teaspoon coriander
- 1/4 teaspoon cinnamon
Directions
- Preheat oven and baking sheet to 450 degrees.
- For each "way", combine oil and spices in a medium sized bowl. Toss sweet potato fries in the oil and spice mixture until well coated.
- Spread all 3 prepared sweet potato fries in a single layer on a rimmed baking sheet. Bake for 15-20 minutes. Flip, and continue baking for an additional 10-15 minutes (or until they are lightly browned). Total baking time is approximately 25-30 minutes.
Serves 4-6 as a side dish.*Inspired by Simply Recipes.
 Samoas are my most favorite girl scout cookie ever. Ever. The chocolate. The coconut. The gooey caramel. All combined into a little bite of confectioner's heaven.If you crave these cookies as much as I do, but are tired of having to wait anxiously for the arrival of girl scout cookie season every year, then this recipe is for you. With a little time spent in the kitchen, you can now enjoy these caramely, chocolatey, coconut Samoas all year round. Mmm, okay. Twist my arm! Homemade SamoasCookies
- 1 cup butter, softened
- 1/2 cup sugar
- 2 cups all-purpose flour
- 1/4 teaspoon baking powder
- 1/2 teaspoon salt
- 1/2 teaspoon vanilla extract
- up to 2 Tablespoons milk
- Preheat oven to 350 degrees.
- In a large mixing bowl, cream together butter and sugar. Mix in flour, baking powder, and salt at a low-speed. Then add the vanilla and milk, adding in milk only as needed to make the dough come together without being sticky. The dough will be a soft, not-too-sticky ball.
- Divide the dough into 2-3 portions. Roll out each portion between two pieces of wax paper to about 1/4 inch thickness or less (thinner dough will yield a crispier cookie when baked). Using a 1 1/2 inch cookie cutter, cut out round cookies. Transfer the rounds to a parchment lined baking sheet. (Optional - use a knife or a straw to cut a small hole in the center of each cookie). Repeat with remaining portions of the dough.
- Bake cookies for 10-12 minutes or until the bottoms are lightly browned. Let cool for a few minutes and then transfer to a wire rack.
Topping
- 3 cups shredded coconut (sweetened or unsweetened)
- 12 oz. good quality chewy caramels
- 1/4 teaspoon salt
- 3 Tablespoons milk
- 8 oz. dark or semisweet chocolate (chips are okay)
- Preheat oven to 300 degrees. Spread coconut evenly on a parchment lined baking sheet. Toast for 10-20 minutes stirring every 5 minutes until coconut is lightly toasted. Cool, stirring occasionally, and set aside.
- Unwrap caramels and place in a microwave safe bowl with milk and salt. Microwave on full power for 3-4 minutes, stirring every 60 seconds, until caramel is melted. When smooth, fold in the toasted coconut.
- While the topping is still hot, spread on cooled cookies, using about 2-3 teaspoons per cookie. (If the topping gets too firm to work with, just pop it into the microwave for a few seconds to loosen it up again.)
- While topping sets up, place chocolate in a small microwave safe bowl. Heat on full power in the microwave in 45 second intervals. Stir after each interval to prevent scorching. Once melted, dip the base of each cookie into the chocolate and immediately place on parchment paper. Transfer all remaining chocolate to a Ziploc bag. Snip off one corner to make a piping bag and drizzle chocolate over the cookies.
- Let chocolate set completely before storing in an air tight container.
*Original recipe from Sweetly Serendipity. (I should also thank Lauren, over at L-Mo Cooks...and Reads, for discovering the source of this recipe and passing it along for me to give it a go!)
 This simple concoction has been my go to chip-n-dip for several years now. It's easy, appeals to most all palates, and can become quite addicting. For that reason, it's become pretty much "required" at every family function in the past few years. It's perfect as a chip-n-dip appetizer, or, if you're my husband, it makes the perfect snack (and sometimes meal) while watching sports. Whenever I don't know what to bring to a potluck or last minute shindig, this is what I bring. Salsa Cheese DipIngredients
- 1 cup salsa
- 1 1/2 cups shredded cheese (taco, mexican, or cheddar are great)
- 1 (8 oz.) package cream cheese, softened
- 1 cup sour cream
- Tortilla chips
Directions
- In a medium-sized bowl, cream together the softened cream cheese and sour cream using a hand mixer.
- Add the salsa and cheese and mix well. (You can just mix with a spoon here if you prefer.)
- Serve immediately with your favorite tortilla chips or refrigerate for later.
Note: I've always served this dip cold, but I imagine it'd probably be just as great heated and served warm.
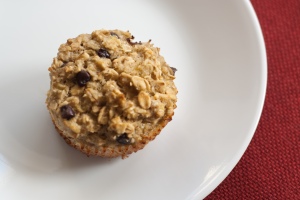 Welcome to the first installment of my new blog feature, Toddler Tuesdays!While hunting for quick and healthy breakfast ideas that both my soon-to-be toddler and I would enjoy, I came across this great recipe idea over at Green Lite Bites
.
I especially loved them because there are no heaping cups or even half cups of added sugar! They also give a delicious purpose to those almost black bananas sitting on your counter that are otherwise soon to be in the trash. They're quick, nutritious, taste great, AND they're portable. Broken into small pieces, they were a perfect finger food for my little one and a great variation on the usual bananas and oatmeal breakfast. Hubby and I gobbled 'em up just as fast as our little peanut did!Even better, this recipe is also incredibly flexible and can be tweaked in about a million different ways, so feel free to experiment with using different fruits and add-ins and get creative! (In fact, if you head over to the original recipe, Green Lite Bites, you'll find plenty of inspiration for variations on this recipe in the comments section.)Banana Oatmeal Breakfast Cups with Chocolate ChipsIngredients
- 3 mashed ripe bananas (the more ripe the better)
- 1 cup Vanilla Almond Milk* (you can use skim, 1 or 2%, or whole milk if serving to little ones under 1 year old - I did - but you might want to add a little sweetener like agave nectar, splenda, truvia, etc. if you do; honey is okay too, as long as serving to 1 year olds and up)
- 2 eggs
- 1 Tablespoon baking powder
- 3 cups Old Fashioned or Rolled Oats
- 1 teaspoon vanilla extract
- 3 Tablespoons mini chocolate chips
- Optional add-in ideas:
- 1 Tablespoon ground flax seed
- A few shakes of cinnamon (to taste)
- walnuts* or raisins instead of chocolate chips
*Recommended for 1 year olds and up, assuming no known nut allergies.Directions1. Preheat oven to 375 degrees.2. Combine all ingredients, except for the chocolate chips, in a large bowl and mix together. Set aside.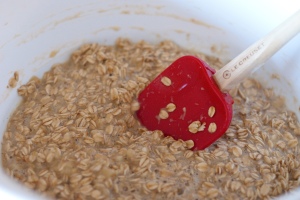 3. Line a muffin pan with liners and spray them lightly with cooking spray.
 4. Add the mini chocolate chips to the batter and mix well.
 5. Spoon the batter into 15 muffin cups, filling them almost all the way. (A level scoop of an old-fashioned ice cream scoop is actually the perfect amount.)
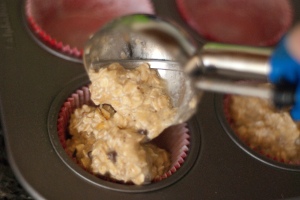 6. Bake 20-25 minutes or until firm to the touch and edges start to brown slighly. (20 minutes was all I needed, but I know all too well that oven temps can vary.)
 Note: As I mentioned above, this recipe is incredibly flexible and can be tweaked in about a million ways, so please experiment and get creative! And definitely let me know here in the comments if you find a new variation you love. I'm always looking for new ideas too!
Approx Nutritional Information per serving
Servings |
Amt per Serving |
|---|
15 |
1 oatmeal cup |
Calories |
Fat |
Fiber |
WWPs |
|---|
115 |
3g |
2g |
2 |
Sugar |
Sat Fat |
Carbs |
Protein |
|---|
6g |
1g |
21g |
4g |
*Original recipe and nutritional info comes from Green Lite Bites. A great site I recently came across that is full of healthy and delicious recipes. Definitely one worth checking out! (FYI, WWPs stand for Weight Watcher Points.)


