Monday, February 28, 2011

Roasted Red Potatoes with Garlic and White Wine

Last week we had quite a few leftover red potatoes after making this delicious recipe.  Not wanting them to go to waste, I planned to use them as a side dish.  In the past I've always just drizzled them with olive oil, salt, pepper, and maybe a little rosemary or another spice here or there, and while they were always good, they never really impressed me.  So after searching for something to give it that little something extra it was missing, I ended up with the recipe below. 

Turns out, the only thing I was missing was white wine!  The white wine cut the heaviness of the olive oil and transformed this side dish into one I will turn to often instead of just when "I want to use up a big ole bag of red potatoes".  And that's a win in my book. 

The original recipe (link at the very bottom) called for using 5 whole heads of garlic and roasting them alongside the potatoes and then squeezing the juice out of them on top of the potatoes (which I'm certain would be heavenly); however, I wasn't willing to use up my whole week's worth of garlic all for one side dish, so I just used several minced cloves instead.  I'm sure the roasted whole heads of garlic would bring this dish to a whole new level, but I found my impromptu version below gave a similar result with all the same great flavors. 

Regardless of which method you choose, no matter how you roast it, potatoes, garlic, olive oil, white wine, and a little S & P are an incredible pairing. 

Roasted Red Potatoes and Garlic

Ingredients

  • 10 large red potatoes

  • 6 garlic cloves, minced

  • Olive oil

  • Dry white wine (I prefer Chardonnay)

  • Kosher salt and freshly ground black pepper


Directions

  1. Preheat oven to 375 degrees.

  2. Quarter the potatoes and spread in a single layer on a large rimmed baking sheet. 

  3. Drizzle a good dose of olive oil over the potatoes.  Then drizzle with dry white wine (using approximately equal amounts of olive oil and wine).

  4. Sprinkle the minced garlic over the potatoes.  Season with salt and pepper, to taste.

  5. Cover tightly with foil and bake for approximately 40 minutes or until potatoes are fork tender.


*Recipe adapted from this one.
Thursday, February 24, 2011

Vegetarian Tortilla Black Bean Pie

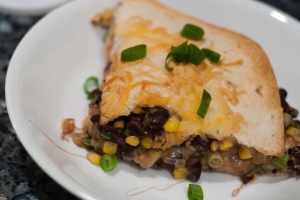
I made this dish for the first time last night and the first words out of my husband's mouth after taking his first bite were, "Yep, definitely make this again."  I took that to mean it's a keeper.  And I fully agree with him. 

For some reason my husband and I are very drawn to dishes that have a mexican-american (for lack of a better term) flare to them.  Don't get me wrong, he loves meat and potatoes just as much as the next guy, but since our self-imposed budget won't allow us to dine on filet mignon and porterhorse steaks every night of the week, we tend to be drawn to meals such as this one for all those nights inbetween.  Why?  Well, they typically have beans and lots of veggies which make us feel healthy, and best of all - they tend to couple that healthy deliciousness with a little cheese.  And when you're from the midwest, everything is better with cheese.  So...double win!  I know, I know, not so wonderful for the healthy factor, but hey everything in moderation.  Kind of like meat and potatoes.

But back to the recipe... 

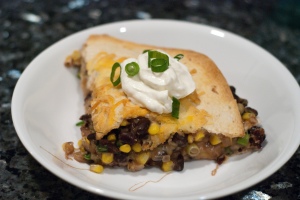
I know it doesn't look very classy or pretty on the plate, but whatever it's lacking in looks, it sure makes up for in taste. 

Vegetarian Tortilla Black Bean Pie

Ingredients

  • 4 (10-inch) flour tortillas

  • 1 tablespoon canola oil

  • 1 large onion, diced

  • 1 jalapeno, seeded and minced

  • 2 cloves garlic, minced

  • 1/2 teaspoon cumin

  • salt and freshly ground black pepper

  • 2 (15-oz) cans black beans, drained and rinsed

  • 1.5 cups of water OR 12 oz beer

  • 1 (10 oz) package frozen corn

  • 4 scallions, sliced, plus more for garnish

  • 8 oz shredded Mexican/Taco flavored cheese

  • sour cream or greek non-fat yogurt (really, you won't notice the difference and it's healthier!) and salsa for serving


Directions

1.  Preheat oven to 400 degrees.  Trim the tortillas to fit a 9-inch springform pan.

2.  Add 1 tablespoon canola oil to a skillet and heat over medium heat.  Add the onion, jalapeno, garlic, cumin, and salt and pepper to taste.  Cook for 5-7 minutes or until onions are translucent.

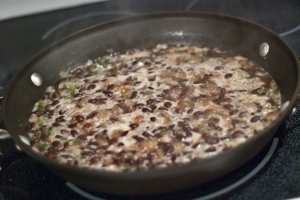
3.  Add the beans and water (or beer) to the skillet and bring to a boil.  Once boiling, reduce to a simmer and cook until almost all liquid has evaporated. 


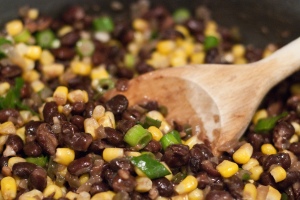
4.  Add the corn and scallions to the skillet, mix, and remove from heat.  Season with salt and pepper to taste.


5.  Place one of the trimmed tortillas in the bottom of the springform pan.  Spread 1/4 of the beans and a light layer of cheese on the tortilla and repeat 3 times.  Sprinkle the remaining cheese on the top layer.  Bake approximately 20-25 minutes or until cheese is melted.  Unmold the pie, slice into wedges, and garnish with scallions.  Serve with sour cream/non-fat greek yogurt and salsa.


*Original recipe courtesy of Annie's Eats.  Love that blog.

Note:  This was the first time I made this recipe, so I followed it pretty much as it was written.  Next time I plan to add another jalapeno and to use red onion (instead of a yellow one as I did here) for even more of a flavor punch.

Saturday, February 19, 2011

Roast Cornish Hens with Vegetables

When you want to impress your man (or even better, your lady) without spending hours in the kitchen, this dish fits the bill. 

Had it not been for seeing my post-college roommate prepare this dish one night 7 or 8 years ago, I never ever would have thought to try roasting a cornish hen at home.  I was an extremely novice home cook at the time, and cooking a whole anything (chicken, hen, you name it) sounded absolutely terrifying.  But after watching how easy this was to prep and smelling the aroma of the spices as they permeated our beloved Chicago apartment (loved that old 1920s building...), I knew I had to try it.  Sure enough, it was so much easier than I expected (no carving involved!).  It came from one of those small, grocery check-out lane, impulse magazines titled "Easy Meals for Two" after all, and they were right - pretty darn easy and pretty darn impressive.  My fiance (now husband) and I absolutely loved this dish the first time we tried it several years ago, so I was beyond thrilled when I happened to stumble across this recipe in my binder just a few days ago so we could enjoy it once again. 

Notes:  The spice rub for this dish is fantastic and one that I plan to use on mixed vegetables as a side dish.  I'm guessing they would pair nicely with pork, steak, or other chicken dishes.  Additionally, the original recipe only served 2, so I doubled it here for a family of 4, leftovers, or in case you're really, really hungry.  If you want this to serve 2, just use one hen, cut everything in half, and bake for about 40-50 mins in an 11x7 (2 quart) baking dish. 

Roast Cornish Hens with Vegetables

Ingredients

  • 2 cornish hens, 24 oz. each (thawed if frozen)

  • 2 teaspoons garlic salt

  • 2 teaspoons chili powder

  • 1 teaspoon ground ginger

  • 1 teaspoon ground cumin

  • 4 tablespoons olive oil

  • 2 medium sweet potatoes, peeled, and cut into 1-inch pieces (4 cups)

  • 4 small red potatoes, quartered

  • 2 small green bell peppers, cut into 1-inch pieces (2 cups)


Directions

1.  Preheat oven to 400 degrees.  Spray a large roasting pan with cooking spray or brush with olive oil. 

2.  Remove and discard neck and giblets from hens (Some come with them already removed, like mine did.  Score!).  With kitchen shears, cut hens in half and place skin side up in roasting pan.


3.  In a large bowl mix garlic salt, chili powder, ginger, cumin, and oil.  Brush hens with 2 tablespoons of the oil/spice mixture. 


4.  Add the sweet potatoes, red potatoes, and bell peppers to the bowl of the remaining oil/spice mixture, toss to coat, and arrange vegetables around the hen halves in the roasting pan.


5.  Bake 45-50 minutes or until hen halves are fork tender, juices run clear, and vegetables are tender.  Serve and enjoy.  The meat will easily pull away from the bones with a fork (or fingers!).  No carving needed!


Serves 4

*Recipe adapted from the magazine, "Easy Meals for Two".  Unfortunately, I have no idea who wrote it since I discovered this recipe almost 8 yrs ago.  My apologies!

Sunday, February 13, 2011

Panko Crusted Salmon


I had always been afraid to cook salmon at home, but once I was pregnant, my husband and I made a point to eat fish at least once a week.  All of the omega-3s are great for baby brains and they're pretty darn amazing for adult-sized humans too.  Better yet, salmon is lower in mercury than most fish. 

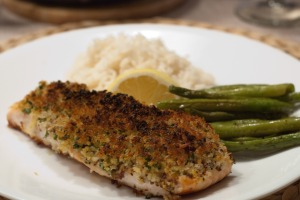
This salmon recipe came to me by way of my friend Erin...who discovered this recipe on another great food blog, Pink Parsley...who discovered this recipe in Barefoot Contessa How Easy Is That?.  So it's done a bit of traveling, but for good reason.  This one is worth sharing...and keeping.  Besides, you really can't go wrong when you know Ina Garten is behind the recipe.  Regardless, I'm so glad this salmon recipe made its way to my inbox, and I hope you'll try it and pass it along as well.  It is the best salmon recipe I've tried at home, is pretty darn healthy, and is easy peasy.  And when I say easy peasy, I mean all you do is mix the crust ingredients together, put it on the salmon, and cook it.  For serving, I followed Pink Parsley's suggestion and served this with roasted green beans and a side of rice.  Delish!

Panko Crusted Salmon 

  • 4 (6-8 ounce) salmon filets (I buy the frozen pack of salmon filets from Costco)

  • 2/3 cup panko

  • 2 tablespoons minced fresh parsley

  • 2 teaspoons grated lemon zest

  • salt and freshly ground black pepper

  • 3 tablespoons olive oil, divided 

  • 3 tablespoons Dijon mustard (I prefer whole grain Dijon mustard)

  • lemon wedges for serving

  •  


  1. Preheat the oven to 425 degrees. 

  2. Mix together the panko, parsley, lemon zest, 1/2 teaspoon salt, 1/2 teaspoon pepper, and 2 tablespoons of the olive oil in a small bowl, and stir until well mixed. 

  3. With the salmon filets on a cutting board or large plate, brush Dijon mustard on the tops of the filets and season with salt and pepper. Using your hands, press a generous portion of the panko mixture onto the top of each filet. 

  4. In an ovenproof skillet set over medium-high heat, heat 1 tablespoon of olive oil.  When the oil is very hot, add the salmon filets to the pan (crust side facing up) and sear the bottom side for 3-4 minutes without turning.  Really, just leave it there for 3-4 minutes.

  5. Transfer the pan to the hot oven and cook for 5 - 7 minutes, or until the salmon is almost cooked through and the panko is lightly browned.  (If the panko is not browning, you can always turn on the broiler for the last minute or two.  Just be sure to keep an eye on it so the crust doesn't burn!) 

  6. Remove the skillet from the oven and tent with foil, letting it rest for 5 - 10 minutes.  Garnish with lemon wedges.


Serves 4

*Original recipe can be found in the cookbook Barefoot Contessa How Easy Is That? by Ina Garten.

Thursday, February 10, 2011

Crock Pot Chicken Taco Soup


Chicken Taco Soup - one of my new favorite crock pot recipes, courtesy of a fellow SAHM friend, Anne.  I've always loved the ease of cooking with a crock pot, but after my son was born I fell in love with it all over again.  I can prep while he's napping and let dinner cook all day while we play or run errands.  If you love the ease of the crock pot and how tender it can make any and all meat, then try this recipe.  It just earned a spot in this household's regular rotation!  Can't wait to have the leftovers for lunch tomorrow.

Crock Pot Chicken Taco Soup

Ingredients

  • 3 boneless, skinless chicken breasts

  • 1 chopped onion

  • 1 (15 oz.) can corn, drained

  • 1 can black beans, rinsed and drained

  • 2 (10 oz.) cans diced tomatoes with green chiles

  • 1 (8 oz.) can tomato sauce

  • 4 oz. can diced green chiles

  • 1 can/bottle of beer

  • 1 packet taco seasoning

  • 1/2 teaspoon cayenne pepper, or to taste (optional, but I like a little heat)


Additional toppings (optional): 

  • shredded cheddar cheese (a "must" in my opinion)

  • plain non-fat greek yogurt or sour cream

  • tortilla chips

  • avocado


 Directions

  1. Mix all ingredients in a crock pot making sure the chicken is submerged under the liquids.  Cook on high for 3 hours. 

  2. After 3 hours, remove the chicken breasts, shred them, and return to the crock pot. 

  3. Turn heat down to low and let simmer for another 2 hours. 

  4. Serve and top with your favorite toppings (i.e., shredded cheese, sour cream, tortilla chips, avocado).


Serves 6.

*Recipe adapted from my fellow SAHM friend, Anne P.  Thanks, Anne, for a great keeper recipe!

Monday, February 7, 2011

Saffron Butternut Squash Risotto


After a night of watching Mario Batali whip up butternut squash risotto on Iron Chef America, my husband and I perused our 8,000 cookbooks and discovered this version by Ina Garten.  With bacon (pancetta), wine, butternut squash, and saffron, we knew we couldn't go wrong.  This is the first risotto recipe we ever made, and it's the one that got our family hooked.  It's definitely fancy enough to serve for company, but only if you want to share.  And I don't know if you will after tasting this dish.  It's pure heaven. 

Try it.  It's easier than you'd think!

Saffron Butternut Squash Risotto

Ingredients

  • 2 lbs. butternut squash (use pre-cut to speed things up)

  • 2 tablespoons olive oil

  • Salt and pepper

  • 6 cups chicken stock

  • 6 tablespoons unsalted butter

  • 2 oz. pancetta or bacon, diced

  • ½ cup minced shallots

  • 1 ½ cups arborio rice

  • ½ cup dry white wine

  • 1 teaspoon saffron threads

  • 1 cup freshly grated parmesan cheese


Directions

  1. Preheat the oven to 400 degrees.

  2. If you bought a whole butternut squash, peel it, remove the seeds, and cut into 3/4-inch cubes.  You’ll want about 6 cups. 

  3. Spread the butternut squash cubes on a sheet pan lined with foil for easy cleanup and toss with 2 T olive oil, 1/2 teaspoon salt, and 1/2 teaspoon pepper.  Roast in the oven for 25 to 30 minutes, tossing once about half way through, until very tender.  Set aside when done.

  4. Heat the stock in a covered saucepan on low heat and keep at a simmer.

  5. Heat a heavy-bottomed pot or Dutch oven over medium-low heat and add the butter.  When melted add the pancetta and shallots.   Cook until the shallots are translucent but not browned, about 10 minutes.

  6. Add the rice and stir until coated with butter.  

  7. Add the wine and cook for 2 minutes.  

  8. Add 2 ladles of stock, the saffron, ½ tsp salt, and ½ tsp pepper to the rice.  Stir and simmer until stock is absorbed, 5 to 10 minutes.  

  9. Continue adding stock, 2 ladles at a time, stirring every few minutes. Each time, cook until the liquid is absorbed, then add more stock. Continue adding stock until the rice is cooked al dente, about 30 minutes total.

  10. Remove from heat and add the roasted butternut squash cubes and parmesan cheese.  Mix well and serve.


Serves 4

*Recipe adapted from Barefoot Contessa Family Style by Ina Garten.

Wednesday, February 2, 2011

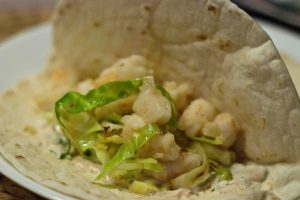
Super Simple Shrimp Tacos

I first had fish tacos at a restaurant a few months ago and I instantly fell in love with them.  If you want a quick, healthy, restaurant quality recipe for enjoying them at home, then this is it.  But heck, even if you've never had fish tacos before, this is a great way to try them.  These were easy to prep and full of all the flavors I was looking for.  Definitely a keeper.  Can't wait to make them again! 

Super Simple Shrimp Tacos

Ingredients
  • 1 lb frozen peeled & deveined cooked shrimp, defrosted
  • 6 oz fat free plain greek yogurt
  • ¼ cup chopped cilantro
  • 2 tbsp fresh lime juice
  • 1/2 tsp cayenne pepper
  • ½ a head of cabbage, thinly sliced
  • 8 corn tortillas (flour tortillas will work as well, but use corn if you can)
  • 4 tsp extra virgin olive oil
  • Salt and pepper to taste

 Directions
  1. Combine yogurt, cayenne, lime juice, cilantro, and salt in a small bowl and set aside.
  2. Heat a dry skillet over medium heat.  Place tortillas in the skillet and heat just until warm and starting to form small brown spots.  Set aside on a plate and cover with a clean kitchen towel.
  3. Add two teaspoons of olive oil to the same skillet over medium heat.  Add cabbage.  Cook for approximately 4 minutes.  Season with salt and pepper.  Set aside.
  4. Cut defrosted shrimp into thirds.  Heat 2 teaspoons of olive oil in the same skillet over medium heat and season with salt, pepper, and a dash of cayenne.  Cook for 2-3 minutes, just until warmed.  (Be careful not to overcook!)
  5. Assemble the tacos by placing the cilantro sauce, shrimp, and a scoop of cabbage on each warmed tortilla.

Serves 4. 

Nutritional Analysis

Calories: 264; Total Fat: 5.8g; Saturated Fat: 0.4g; Cholesterol: 850mg; Sodium: 850mg; Carbohydrate: 23g; Dietary Fiber: 4.6; Sugars: 6g; Protein: 30.2g

*Original recipe (and nutritional analysis) courtesy of the healthy eating blog I follow, Dani Spies.

Tuesday, February 1, 2011

Enchiladas Verdes De Pollo

If you're looking for an easy, pretty darn healthy, full of flavor, weeknight keeper meal (who isn't?), you must, must, must try this recipe.  The star of the show is by far the green salsa mixture, which is bursting with flavor.  I was shocked by how delicious these were, as was my husband, especially considering the original recipe came from a diabetes cookbook...shhh.  I'll definitely be making these again.  Very soon.  Very, very soon.  And you should too!

Enchiladas verdes de pollo

Ingredients
  • 1 1/4 cup medium green salsa
  • 1/4 cup fresh cilantro
  • 1/4 cup fresh parsley
  • 1 tablespoon lime juice
  • 2 garlic cloves
  • 2 1/2 cups chopped cooked chicken (approx. 3 breasts)
  • 1 cup shredded mozzarella cheese, divided
  • 6 tortillas (6-8 inches in diameter)
  • 1 lime, cut into wedges (optional)
Directions
  1. Preheat oven to 350 degrees.
  2. In a food processor or blender, combine green salsa, cilantro, parsley, lime juice, and garlic.  Blend on high speed just until smooth.
  3. Mix together half of the salsa mixture, the chicken, and 1/3 cup of the cheese.
  4. Spray an 11x7 glass baking dish with non-stick cooking spray.
  5. Fill each tortilla with approximately 1/4 cup of the chicken mixture.  Place seem side down in the baking dish.
  6. Pour the remaining salsa mixture over the filled tortillas.  Top with 2/3 cup of the mozzarella cheese.
  7. Bake for 20 minutes, uncovered, or until heated through.  Garnish with lime wedges (optional)
*Recipe courtesy of a friend of mine who discovered the original recipe in the Betty Crocker Diabetes Cookbook of all places...surprise surprise!  I followed the suggestions in my friend's post for modifying it if you're not on any dietary restrictions, but if you are and you want it to be more diabetes friendly, you'll only need to reduce the following ingredients:  Use only 1 cup of green salsa, 2 cups of chicken, and reduce the mozzarella cheese to only 3/4 cup total (using 1/4 cup in the chicken filling mixture and only 1/2 cup as the topping). 
Related Posts Plugin for WordPress, Blogger...